A guide to help you customise your Scenery Theme.
Install Scenery Theme | Site Settings | Adding Work | Creating a Portfolio Landing Page | Creating a Splash Page | Adding Normal Pages | Adding a CV | Creating the Menu
Install Scenery Theme
Under Appearances > Themes, click Add New and Upload Theme. Find the theme’s .zip file, upload and activate.
Site Settings
Scenery-specific settings, accessed under Site Settings in the dashboard sidebar.
Global Settings
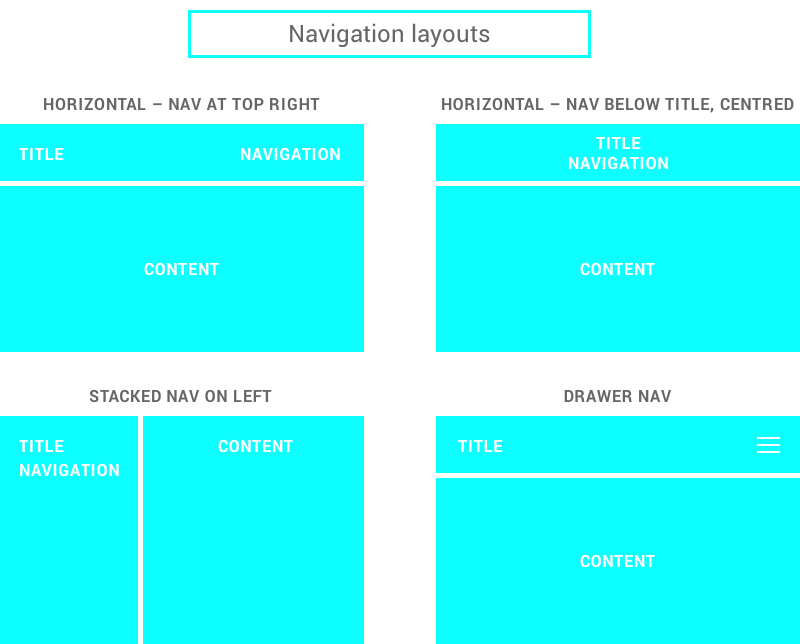
Choose your navigation layout, and optionally upload a logo and/or favicon.
Colours
Choose if you want to customise any colours. Options available include:
- Text colour
- Header & footer text colour
- Page background
- Header & footer background
- Header & footer divider keyline
- Nav drawer background colour.
Work Settings
Defines the layout of your work pages.
- Choose to show category filter on work landing pages
- Align the thumbnails/text to the left or centre
- Choose which content to display under the image on a thumbnail layout (title, subtitle, categories)
- Align the thumbnail meta info (subtitle, category) to the left or centre
- Displays title of previous/next works as links at bottom of single work pages
Social Media
- Choose a default Facebook sharing image
- Add social media links; these will show up as icons in the footer of the site
Custom CSS
I wouldn’t touch this unless you really know what you’re doing.
Google Analytics
Add it hrrr.
Adding Work
Add all your portfolio items as Work posts. To add a new work/project, select Work > Add New form the sidebar.
Settings in the right Sidebar
- Work Categories: In the right sidebar, add/choose your categories (optional). These categories will allow you to filter your content on the landing page. Categories would be artistic medium or year made.
- Featured Image: the thumbnail image that will display on your landing page. You MUST include a featured image if you’re using an image-based Portfolio Landing Page. Note that this image will NOT show on your single work page unless you add it in your content.
Work settings
- Title
- Permalink (the URL your work will be viewable at; editable after you’ve entered a title)
- Thumbnail size: how large this work displays on your landing page (either 300 or 600px in size)
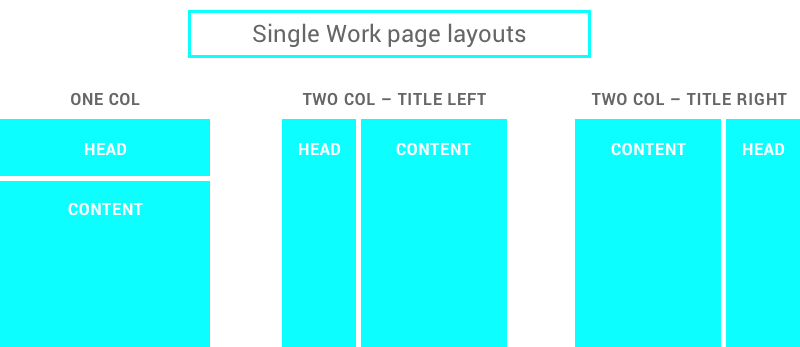
- Page layout: choose single or two column layout options for your heading (title/description) and content (image/text/video)
- Content alignment: on single column layouts, how the heading and content captions align with the content (left or centre)
- Subtitle (optional)
- Show Categories: check to display any categories
- Description put any project description here
Content
Content blocks can be added as images, videos, or text.
- Click the blue “Add content” button and choose a type to add
- Images:
- Multiple images can be added at a time gallery-style, but only one caption
- If you’d like a caption for each image, add multiple image content blocks
- It is suggested you create all images at the same width, and ideally minimum 1024px in width
- Video: Enter a URL and caption (optional)
- Text: use like normal
- Content blocks can be re-ordered by dragging and dropping their top bar
- Delete a content block by clicking the minus sign in the top corner
Creating a Portfolio Landing Page
You can create one portfolio landing page, or multiple pages displaying works from a single category.
- Create a new page by going Pages > Add New
- Add your Title and Permalink
- In the right-hand sidebar under Template, choose either Work Archive: List or Work Archive: Thumbnail
- List template has no images
- Thumbnail template is image based; displaying titles/subtitles/categories is optional.
- Choose your page content to display (and list alignment if applicable).
Other Important Notes:
- Posts are listed in reverse chronological order (newest first). To change the order, change the post’s publish date.
- If you would like all your thumbnails to align in perfect columns, make all your work post’s featured images the exact same size.
To make this your site’s landing page, go to Settings > Reading and choose it as your site’s static front page. (You can ignore the posts page setting.)
Creating a Splash Page
You can make a custom landing page for your site using a single image or colour.
- Create a new page by going Pages > Add New
- Add your Title and Permalink (doesn’t matter what it is, as you won’t see the name anywhere)
- In the right-hand sidebar under Template, choose Splash Page
- Underneath, you can add your image by setting a Featured Image
- Now change the rest of your settings:
- Background Image Alignment
- Image repeat
- Landing page background colour
- Landing page text colour
To make this your site’s landing page, go to Settings > Reading and choose it as your site’s static front page. (You can ignore the posts page setting.)
Adding Normal Pages
Pages can be added for any other type of content. They will not display as work in your portfolio section.
- Create a new page by going Pages > Add New
- Add your Title and Permalink
- If you’d like to hide the page title, uncheck “Display the page title”
- Note that if you add a “heading 1” as the first item on your page, it will be formatted like a page title.
- Add a CV if you desire (see instructions below)
Adding a CV
You can add a formatted CV to any default-template page.
- Check the “Include CV?” box at the bottom of the page, and a new entry field will appear
- CV content needs to be formatted in a specific way:
- CV title: Heading 1
- Section headers: Heading 2
- Dates: Heading 3
- List items: Bullet list item
*Note: If you don’t see the formatting options in the bottom row in the text-editor toolbar, click the last button called “Toggle Toolbar”.
Creating the Menu
Make a menu under Appearance > Menus.
Note that the site name/logo will always link back to your “front page” (as designated under Settings > Reading).
- If a menu does not already exist, click “create a new menu”.
- Select your pages and add to menu, reordering at will
- You can rename a navigation link by expanding the menu item and changing the “Navigation Label” (this will not permanently rename the page)
- Note that submenus will not display
- Be sure to check “The Main Menu” under “Theme locations” at the bottom